Thursday, January 29, 2009

Gamma Lids

My neighbor Angela enlightened me about Gamma lids and I thought I'd pass along this amazing tidbit.

The Gamma lid is a two-part lid. One part snaps onto the top of a 5-gallon bucket and the other part screws into place, forming a nice tight seal. Since they are pricey (6 bucks on sale plus the 3-4 dollar bucket), its not a cost-effective storage method for ALL your flour, sugar, rice, etc. However, it IS a nice solution for storing the things you'll be using in the near future. By the way, the contents of a 25 pound bag fits beautifully in a 5-gallon bucket.

I'm going to use this method for my white and wheat flour, sugar, whole wheat, and dog food. And, I am considering using it for oats, rice, and dried beans, too.

Anglela said that she uses the bucket and Gamma lid for her brown sugar and that the lid keeps the brown sugar soft. I've toyed with the idea of packing all my 2-pound bags of brown sugar into a bucket so that I can pull out one bag at a time.

(Don't you just love the photo of Abby's gaping mouth!)

Tuesday, January 27, 2009

Whole Wheat Bread-- WOW

I've been following a blog lately http://myfoodstoragedeals.blogspot.com and the author recently posted a whole wheat bread recipe which she said was the best she had tried.

The trick is in the sponging technique, the use of Vital Wheat gluten, and the use of lemon juice. I tried it and LOVED it. I cut the recipe in half and it made two huge loaves. Although you can find her post here, I'm going to cut and paste her text into this post, shown below in green, just in case the link breaks. I've added my comments in red.

Emilie's Whole Wheat Bread

Makes four 4 8/4 inch loaves.

7 c. whole wheat flour (grind your own if you have a wheat grinder)
2/3 c. vital wheat gluten
2 1/2 T. instant yeast

5 c. steaming hot water (120-130 F) I was nervous to make the water super hot for fear of killing the yeast, but I went ahead and did it and it worked just fine.

2 T. salt
2/3 c. oil
2/3 c. honey or 1 c. sugar (I like honey the best!) I used honey and loved it.
2 1/2 T. bottled lemon juice

5 c. whole wheat flour I have tried 3 cups white and 2 cups whole wheat. It makes the loaves lighter.

Mix together the first three ingredients in your mixer with a dough hook. Add water all at once and mix for 1 minute; cover and let rest for 10 minutes (this is called sponging). I added a little step here. I turned my oven on to 125 and then turned it off. Then I put my bowl in the warm oven for the sponging.

Add salt, oil, honey or sugar, and lemon juice and beat for 1 minute. Add last flour, 1 cup at a time, beating between each cup. Beat for about 6-10 minutes until dough pulls away from the sides of the bowl. This makes very soft dough.
I've been doing this step a little differently, with good results. I've been alternating the wet and dry ingredients, incorporating each very slowly and mixing well.

Pre-heat oven for 1 minute to lukewarm and turn off. Once again I turned my oven on to 125 and then turned it off. Turn dough onto oiled counter top; divide, shape into loaves place in oiled bread pans. Let rise in warm oven for 10-15 minutes until dough reaches top of pan. I am finding that it is taking about 25 mins. to raise. A few times I have let the loaves get too big. Bigger isn't better. It turns out best when I let the dough reach the top of the pan, maybe a little above but not much. Do not remove bread from oven; turn oven to 350 F and bake for 30 minutes. Remove from pans and cool on racks. This recipe can be halved to make 2 loaves. I halved the recipe and it made 2 huge loaves. Otherwise it makes 4.

*Emilie ONLY uses Bakers Secret 8x4 inch non stick pans (we could only find them at Smith's grocery store, strange enough). I used the pans I had and it was fine.

**Another tip..when the dough is put into the bread pans, squish the dough softly into the corners of your bread loaf pans. This will make your bread cook more evenly and not have the large lump in the middle of your loaf. I squished but still had the hump. The hump isn't a problem for me!

Brenda's assessment: The bread was soft and elastic, almost like store bought bread. I made it yesterday, and the loaf is still soft. The thing I loved about the recipe is that this recipe is FAST compared to some other recipes.

Monday, January 26, 2009

Bean Dip

1 (8 oz) pkg. Cream Cheese
1 (30 oz) can Refried Beans
1 (8 oz) carton Sour Cream
1 (10 oz) Salsa
Shredded Cheddar Cheese

Mix first 4 ingredients together; place in casserole dish and cover with cheese. Bake for 45 minutes at 350 degrees. Serve with corn chips or tortilla chips.

Baked Refried Beans

Baked Refried Bean
32 oz. can Refried Beans
1 cup Salsa (or more if desired)
1 cup Shredded Cheese (or more if desired)

Mix all ingredients together; place in casserole dish and cover with cheese. Bake for 45 minutes at 350 degrees. Delicious served with a taco dinner or filling for bean burritos.

Applesauce Oatmeal Chocolate Chip Cookies

1 Cup Oil
1 Cup Brown Sugar
1 Cup Sugar
3 Eggs
2 Cups Applesauce
4 1/2 Cups flour
3/4 tsp. Salt
1 tsp. Soda
2 tsp. Baking Powder
1 tsp. Cinnamon
1 tsp. Nutmeg
2 1/2 Cups Old Fashioned Oatmeal
12 oz. pkg. Chocolate Chips

Combine all ingredients and mix well. Drop on a greased cookie sheet. Bake for 10 minutes at 350 degrees. The trick to this cookie is not over baking them or under baking them. It is a moist cookie but not doughy.

Gathering Food One Week at a Time


My friend Kathryn shared this file with me (click on the image to enlarge it). It is a proposal of what items you could buy week to week to build up a year's supply of food. It was created for Macey's grocery store customers, so I am sure they'd be more than happy to sell you the items (laughing!)

It is a good example of how saving and buying week to week adds up. If you decide to follow it (or tweak it for your family's needs), be aware that many bulk items are a lot cheaper at the LDS cannery than at Macey's.

Kathryn, thanks for sharing the file!

Sunday, January 25, 2009

Quantity Recommendations

Here are some guidelines to go by when planning your food storage. These were taken from LDS sources. Admittedly, I am not totally certain how this was calculated or what it really means in terms of meals, calories, or consumption but it is at least food for thought.

By the way, I decided to plan for 5 people rather than for the 4 in my household. I figured that I'd rather have too much than too little.

Recommendations for Food Storage Quantities (pounds per person per year)

Grains: 300 lbs.
Legumes: 60 lbs.
Powdered milk: 16 lbs.
Cooking oil: 10 quarts (2.5 gallons)
Sugar/honey: 60 lbs.
Salt: 8 lbs.
Water: 14 gallons for a 2-week period.

Adaptations:

You may have to tweak it to meet your family's needs. For instance, you may need more milk than indicated if you have young children.

Friday, January 23, 2009

Canned Veggies & Beans

Yeah, I know, it seems like a lot. But when you add it all up, it's not quite enough, actually.

Deciding What to Buy: I decided that I wanted to have one canned vegetable for each day of the year. Canned corn and beans are the only two we'll eat, so that's what I bought.

Years ago I'd buy items for emergency use even though we didn't use those items in our regular meals. Lesson learned! Now I buy things that I can and will use.

In addition to the veggies, I bought a stack of refried beans. Since we eat so many of these (and Abby loves them), we go through a ton. I am worried I didn't buy enough.

Rotation: Since the cases were purchased at different times, I put the newer cans on the bottom and stacked them up by age. Each case is dated and the oldest cans will be used first. All I have to do is take from the top of the pile.

Expiration dates: Personally, I don't get too fussy about expiration dates, except if the item is really old. Currently I am using up some really old green beans that are barely edible because years ago I didn't rotate my storage correctly. Lesson learned!

Thursday, January 22, 2009

Sante Fe Tortilla Soup

This recipe is great for using food storage items. My family really likes it and it is easy to make. Be aware that the way it is written makes a large pot, enough for my family of 4 to have at least 3 dinners. It freezes well, and that's why I make such a large pot.

2-3 chicken breasts, cooked and shredded
10 cups of water
8 bullion cubes
1 quart of home-bottled tomatoes (you could substitute canned tomatoes)
1 bag of frozen corn (if you use canned, drain and rinse it first)
2 cans chopped green chilies (4 oz. each)
1 onion chopped (could use dried)
1 green pepper chopped (Tip: I keep them chopped and frozen in my freezer for quick use.)
2 tsp. chili powder
1 1/2 tsp. cumin
1/2 tsp. pepper
1/2 tsp. hot red pepper sauce
1-2 cups coarsely crushed tortilla corn chips

Toppings: Pepper jack cheese, sour cream, more corn chips.

In a large pot, combine all ingredients except corn chips. Simmer until veggies are cooked. Stir in crushed chips and let them completely dissolve (this will thicken the soup). Serve with toppings. TIP: This soup is even better the second day.

Wednesday, January 21, 2009

Getting a Master Plan

Sometimes dealing with food storage seems unbelievably overwhelming. Where do I start? What do I buy first? What approach should I take?

I found a master plan on www.foodstoragemadeeasy.net which really helped me. They suggested the following steps:

Step 1: Shelving & storage
Step 2: Water
Step 3: Three months supply of normal food
Step 4: Long-term supply planning
Step 5: Grains
Step 6: Legumes
(Brenda would add dry milk & drinks with vitamin C in here!)
Step 7: Baking ingredients
Step 8: Fruits and Vegetables
Step 9: Comfort foods
Step 10: Non food items

I liked their plan but I thought it needed four tweaks.

First, for me, I'd rather have a variety of grains, legumes, and fruits and vegetables rather than a ton of one item. So, I'd prefer to work on steps 5-8 simultaneously so that I am acquiring a variety of food.

Second, storing dried milk and powdered drinks with vitamin C is important, especially if you have children.

Third, I'd opt to work on non food items (#10) like toilet paper and tampons before I'd worry about comfort food (#9). Ladies, would you rather have a chocolate cake or a tampon during a disaster? Tampon? I thought so!

Fourth, I wouldn't let lack of shelving hold me up from beginning. You don't need a decked out storage room to start. Yes, plan for shelving and storage space but start gathering even if the shelves aren't in place quite yet.

What are your thoughts, ideas, tweaks? What would work for your situation and family?

Tuesday, January 20, 2009

7-Gallon Water Jugs & Water Weight

We are still trying to get Ted signed up as a co-author, so I thought I would post his recommendations that he emailed to me (there were 2 emails so I sort of combined them and edited to blend it all). He said:

Did you know that one gallon of water weighs 8.34lbs? This is helpful when trying to figure how exactly you're going to manage those large supplies of water, especially when thinking through the portability of each unit.

I've purchased a (2) seven gallon container (58.38lbs/each from a company called Reliant http://relianceproducts.com. They produce a sturdy container....a little more rugged and user friendly than the traditional clear unit. The name of the container is Aqua Tainer. I've also purchased a couple of 55 gallion drums (458.70 lbs)...trust me you can't move these.

The jugs can be purchased online through a couple of distributors (Target...although they charge shipping on the containers which ups the price quit a bit). I purchased mine at Sportsman's Warehouse, although they won't have them until their summer camping equipment comes in, so I haven't been able to pick up additional units at this point.

I'm also researching an easy means of cycling the water every 6 months with the use of a small electric water pump.

Food, Food, and More Food

As some of you know, I have been working on a 4-week Food Storage Menu (breakfast, lunch, and dinner). This menu is mostly made up of things that our family eats on a very regular basis (with some added easy to store items). I felt that if I could find out what commodities I needed for a four week period, I could then realistically decide what we need for a years supply of food.
For example: My family would use approximately 12 gallons of milk in 4 weeks. Multiply 12 by 13, and I find that I need enough powdered milk to make 156 gallons. This process, while time consuming, makes it much easier for me to conceptualize what a years supply actually is.

This task has been a bit daunting at times, but my menu is now complete and I am in the process of tallying the commodity list (which I will happily share once complete). I am finding that we actually need a lot more of some items (canned fruits and veggies, meat, etc), and less of others (some of those things you think of as staples- rice, beans, etc.)

I don't know about the rest of you, but I wouldn't want to be stuck with nothing to eat besides wheat, oats, rice, dried beans, and powdered milk. I would probably live, but. . . what kind of life would that be?

Sorry about the rambling, but as you can see, food has been on my mind lately.
So one request... if you have any recipes that are easy (this is key) and utilize some of the food storage staples, then please, please, please, send them my way. It would probably be nice if they taste good, as well.
-Specifically I am looking for a tried and true whole wheat bread recipe (I have a good 1/2 white- 1/2 wheat recipe, but whole wheat is much more easily stored than flour).
-I am also calling out for any good tuna recipes (Ted would probably question whether "good" and "tuna" could ever belong in the same sentence, but if you think it's good, send it my way and I will try it).

Lasagna (In a slow cooker)

12 Lasagna noodles (uncooked)
1 LB ground beef
1 tsp Italian Seasoning
1 can (28 oz) Spaghetti Sauce
1/4 cup water
1 carton (16 oz) cottage cheese
2 cups mozzarella cheese grated

Break noodles in half and layer 1/3 in bottom of greased 4-5 quart slow cooker. Stir Italian seasoning into meat and spread 1/3 over noodles. Then layer 1/3 sauce, water, cottage cheese, and mozzarella over the meat. Repeat layers. Cook with cover on low heat 4-5 hours. Do not cook more than 5 hours.

**Ideas for better use of food storage items:
1-slightly mashed red beans can be substituted for hamburger (I have not experimented with this recipe, but have used beans as a meat replacement in Spaghetti and Ted didn't even notice).
2-omit the meat all together (we have done this and it works out fine)
3- instead of cottage cheese, make ricotta cheese from pd milk. Directions can be found in the food storage cook book put out by the church (our family all received this for Christmas).
4-Use the equivalent amount of a different type of pasta (This worked fine when I tried it).

Black Bean Salad Recipe

This recipe is great for food storage because everything stores well and you don't have to cook anything (unless you are preparing from dried beans instead of canned).

Black Bean Salad

1-2 cans black beans (or 1 cup dry, prepared)
1 can garbanzo beans
1 can whole kernal corn (optional)
1 can olives (optional)
1 medium tomato, chopped (or 1 can diced tomatoes)
1/2 tsp garlic powder
1/2 tsp black pepper
1/2 tsp chili powder
1/4 to 3/4 tsp red cayenne pepper (depending on your heat sensitivity)
1/3 cup salsa
1/3 cup Italian salad dressing

Combine all canned ingredients. In separate bowl mix Salsa and Italian dressing with the other seasonings. Pour over the bean mixture. Chill and serve.

This is really a hearty meal (usually served with chips). We have it often in the summer. You can also add cooked chicken, fresh peppers, onions, etc.

Monday, January 19, 2009

Finding Storage Space for Water

Okay, after posting my last post regarding water storage options, I had an ah-ha moment. Just like you, I have struggled with where to put all the water.....

.... in the storage room? (but it is nearly full already)
.... in spare bedroom? (but I want guests too!)
.... under the stairs? (but I don't want it near all the wheat that is already there)
.... in the family room? (but our home decor is already hurtin' enough)

I don't want to trip over it. I don't want it in my way. I really don't want to know it's even there.

I'm sure you can appreciate my dilemma because if you are reading this post, you probably are having a similar struggle.

Then it hit me: Look for dead space.

You know, dead space, those spaces deep in closets as well as the nooks and crannies of a house that no one uses and that are not really accessible for everyday stuff.

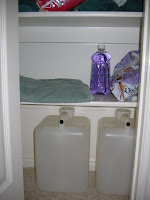
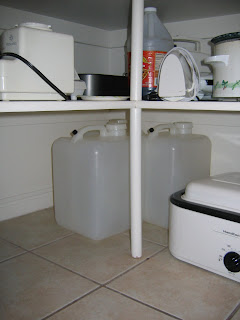
Then I was off on a hunt for dead space. I took a couple of empty 5-gallon jugs and zipped around the house opening closets to see how many jugs I could stash away undetected in my house. The result? I found enough dead space for 37 5-gallon jugs (quick math: that's 185 gallons of water!)

Here are a few photos of my dead space.

Saturday, January 17, 2009

Water Storage Options

It has been recommended that we store 14 gallons of water per person in order to have a 2-week supply of drinking water. That's only 1 gallon a day per person, which isn't much to live on when you consider cooking, basic washing, bathing, and sanitation. You may want to consider storing more. Keep in mind that lack of clean water caused tons of problems in New Orleans during Hurricane Katrina.

Some common storage options are small water bottles, soda pop bottles, 5-gallon jugs (shown in white), 15-gallon jugs (shown in blue), and 55-gallon drums (not shown).

There are advantages and disadvantages to each storage method.

Small bottles & soda pop bottles: They are portable and can fit in smaller storage areas and backpacks. However, it takes a lot of bottles to store a lot of water. For example, you'd have to store about 29 soda bottles to get 15 gallons of water.

5-gallon jugs: They are still portable and are small enough to fit in smaller spaces. But, they don't stack well. You can get these jugs on sale for about $3.99.

15-gallon jugs: They are tall and slender and would fit well in a closet or underneath the stairs. Once full, one person would not be able to lift it. You'll will need a siphon, and you should secure it so it won't tip over. You can get these for about $25 on sale, making them a more expensive option than buying three 5-gallon jugs.

55-gallon drum: It holds a lot of water. If you have the room, this is the way to go. Select placement carefully because that baby isn't going anywhere once it is full. You'll need a siphon and it should be secured. You can pick them up on sale (or at Walmart) for about $40.00, although I've seen some on KSL classifieds for a lot less.

Other recommendations regarding water:
-Consider storing both small and large containers so that you can have the benefits of portability and large quantities.
-Have a water filter.
-Stash a gallon bleach.
-Be sure to buy a siphon for the larger containers.
-Keep a barrier between the water containers and the concrete.
-Anchor the larger containers so they don't tip.
-Anchor your water heater too.
-Review these recommendations for storage and purification.

Recommendations for Beginners
If you haven't stored any water yet and are just beginning, I'd recommend buying a 5-gallon jug for each member of your family today. With a 5-day supply under your belt, you can then decide how you want to proceed with the rest of it.

Wheat Muffins & Peanut Butter Cookies

Wheat Muffins

MIX:
1 cup white flour
1 cup wheat flour
1/2 tsp salt
4 tsp baking powder
1/2 cup brown sugar

MIX:
1 cup milk
2 eggs
1/2 cup vegetable oil

Blend flour mix and milk mix. Fill greased muffin tin 2/3 full. Bake at 325’ for 20 minutes.

*Tip: I always get best results when I use fresh brown sugar. Try this peanut butter cookie recipe the next time you open a new bag of brown sugar.

Peanut Butter Cookies

1 cup brown sugar
1 cup sugar
1 cup shortening
1 cup peanut butter (I like to use crunchy peanut butter.)
2 eggs
1 tsp. vanilla
2 1/2 cups flour
1/2 tsp. salt
1/2 tsp. baking powder
1/2 tsp. baking soda

Blend brown sugar, sugar, shortening, peanut butter, eggs & vanilla. Add flour, salt, baking powder, and baking soda. Blend well. Drop by teaspoonfuls onto lightly greased cookie sheet and smash with fork. Bake 350’ 12 min

Friday, January 16, 2009

Macey's Food Storage Sale until Jan 20th

I thought I'd kick off the website by informing you that this week Macey's is running their food storage ad. I checked the ad for the Ogden, Orem, Spanish Fork, Clearfield, and Pleasant Grove stores. Each is running the same items from Jan.14 to Jan. 20th.

Items of interest include water jugs and drums, canned veggies, bulk items, and Blue Chip products sold in large buckets.

Click here to check the Macey's ad. Enjoy the bargain hunt.

Buying Your First Few Items

If you are just beginning your food storage, I'd recommend starting off with a small variety of a few items and then build upon it. In my opinion, it is better to have a small variety of food rather than tons of one item and nothing else. So, if you are just starting, I'd buy things that I know my family and I would use anyway, such as canned green beans and corn, canned chili, refried beans, tuna, canned peaches or pears, canned spaghetti sauce, pasta, water jugs, sacks of rice, flour, sugar, a bottle of oil, salt, and a can opener.

Date everything and set it aside. For now, it's okay to leave the flour, sugar, and rice in its original packaging, but as you gather and store more and more bulk items, proper packaging will become necessary. But, for now, just get a few of the basics stashed in your pantry. Yes, rotation is important, but if you are just beginning then the idea is to have enough on hand that you can take care of yourself for a while.